Hai, Habr.
Suatu ketika saya menemukan deskripsi aplikasi Android yang menentukan detak jantung dengan kamera ponsel, hanya dengan gambaran umumnya. Kamera tidak diterapkan pada jari, tidak diterangi oleh LED. Hal yang menarik adalah bahwa peninjau tidak percaya pada kemungkinan penentuan denyut nadi seperti itu, dan aplikasi ditolak. Saya tidak tahu bagaimana akhirnya pembuat program tersebut, tetapi menjadi menarik untuk memeriksa apakah ini mungkin.
Bagi mereka yang tertarik dengan apa yang terjadi, kelanjutan akan dipotong.
Tentu saja, saya tidak akan membuat aplikasi untuk Android, jauh lebih mudah menguji idenya dengan Python.
Kami menerima data dari kamera
Pertama, kita perlu mendapatkan streaming dari webcam, yang akan kita gunakan OpenCV. Kode ini lintas platform dan dapat berjalan di Windows dan Linux / OSX.
import cv2
import io
import time


cap = cv2.VideoCapture(0)
cap.set(cv2.CAP_PROP_FRAME_WIDTH, 1920)
cap.set(cv2.CAP_PROP_FRAME_HEIGHT, 1080)
cap.set(cv2.CAP_PROP_FPS, 30)

while(True):
    ret, frame = cap.read()

    # Our operations on the frame come here
    img = cv2.cvtColor(frame, cv2.COLOR_BGR2GRAY)

    # Display the frame
    cv2.imshow('Crop', crop_img)
    if cv2.waitKey(1) & 0xFF == ord('q'):
        break

cap.release()
cv2.destroyAllWindows()
, - , , .
x, y, w, h = 800, 500, 100, 100
crop_img = img[y:y + h, x:x + w]

cv2.imshow('Crop', crop_img)
, ( ) :

, , . .
heartbeat_count = 128
heartbeat_values = [0]*heartbeat_count
heartbeat_times = [time.time()]*heartbeat_count

while True:
    ...
    # Update the list
    heartbeat_values = heartbeat_values[1:] + [np.average(crop_img)]
    heartbeat_times = heartbeat_times[1:] + [time.time()]
numpy.average , , .
:
fig = plt.figure()
ax = fig.add_subplot(111)
while(True):
    ...

    ax.plot(heartbeat_times, heartbeat_values)
    fig.canvas.draw()
    plot_img_np = np.fromstring(fig.canvas.tostring_rgb(), dtype=np.uint8, sep='')
    plot_img_np = plot_img_np.reshape(fig.canvas.get_width_height()[::-1] + (3,))
    plt.cla()

    cv2.imshow('Graph', plot_img_np)
: OpenCV numpy, matplotlib , numpy.fromstring.
.
, , , " ", - . - !
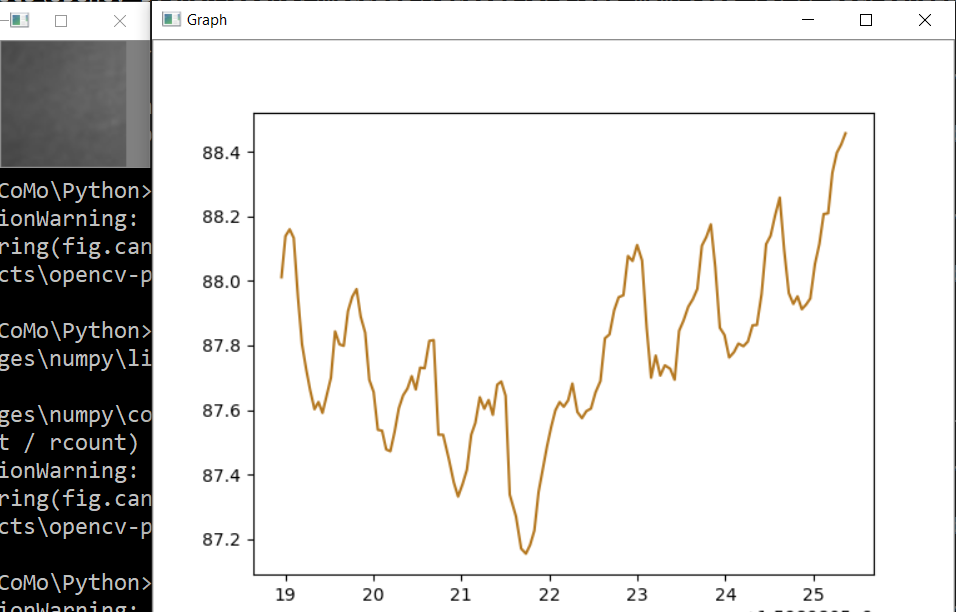
, , , . , ! , 0.5% , " ", . , , 75bpm. , :
, .. , , .
, . , . , , OpenCV . , .
, - , ? , . cap = cv2.VideoCapture(0) cap = cv2.VideoCapture("video.mp4"), .
, .
Spoiler
import numpy as np
from matplotlib import pyplot as plt
import cv2
import io
import time

# Camera stream
cap = cv2.VideoCapture(0)
cap.set(cv2.CAP_PROP_FRAME_WIDTH, 1920)
cap.set(cv2.CAP_PROP_FRAME_HEIGHT, 1280)
cap.set(cv2.CAP_PROP_FPS, 30)
# Video stream (optional)
# cap = cv2.VideoCapture("videoplayback.mp4")

# Image crop
x, y, w, h = 800, 500, 100, 100
heartbeat_count = 128
heartbeat_values = [0]*heartbeat_count
heartbeat_times = [time.time()]*heartbeat_count

# Matplotlib graph surface
fig = plt.figure()
ax = fig.add_subplot(111)

while(True):
    # Capture frame-by-frame
    ret, frame = cap.read()

    # Our operations on the frame come here
    img = cv2.cvtColor(frame, cv2.COLOR_BGR2GRAY)
    crop_img = img[y:y + h, x:x + w]

    # Update the data
    heartbeat_values = heartbeat_values[1:] + [np.average(crop_img)]
    heartbeat_times = heartbeat_times[1:] + [time.time()]

    # Draw matplotlib graph to numpy array
    ax.plot(heartbeat_times, heartbeat_values)
    fig.canvas.draw()
    plot_img_np = np.fromstring(fig.canvas.tostring_rgb(), dtype=np.uint8, sep='')
    plot_img_np = plot_img_np.reshape(fig.canvas.get_width_height()[::-1] + (3,))
    plt.cla()

    # Display the frames
    cv2.imshow('Crop', crop_img)
    cv2.imshow('Graph', plot_img_np)
    if cv2.waitKey(1) & 0xFF == ord('q'):
        break

cap.release()
cv2.destroyAllWindows()
Dan seperti biasa, semua eksperimen berhasil